# EMS-ESP version 2.0
## **New Features in v2**
- Supports both ESP8266 and ESP32
- New MQTT option to support Home Assistant MQTT Discovery (https://www.home-assistant.io/docs/mqtt/discovery/)
- A new web interface using React and TypeScript that's now secure as each URL endpoint is protected by issuing a JWT which is then sent using Bearer Authentication.
- In the Access Point mode there is a web Captive Portal
 - A new console. As in version 1.9 it works with both Serial and Telnet but now with a more intuitive Linux shell like behavior. It supports multiple connections and has basic security to prevent any changes to EMS-ESP. A full list of commands is below, here are the key ones:
* `help` lists the commands and keywords. This works in each context.
* `exit` will exit the console or exit the current context. CTRL-D does the same.
* `CTRL-U` for Undo
* `TAB` for auto-complete
* Some specific commands are behind contexts. Think of this as a sub-menu. e.g. `system`, `thermostat`. The path will always show you which context you are in. `$` is the root.
* `su` will switch to super-user or Admin. The default password is "ems-esp-neo" and can be changed with `passwd` from the system menu or via the Web UI (called secret password). When in Admin mode the command prompt switches from `$` to `#`.
* Some settings can be changed in the console. The `set` command will list them.
* `show` shows the data specific to the which context you're in. From the root it will show you all the EMS device information and any external temperature sensors. From a context it will be more specific to that context, e.g. `show mqtt` from `system` will list MQTT subscriptions and show the status and queue.
* `log` sets the logging level. `log off` disables logging. Use `log debug` for debugging commands and actions. This will be reset next time the console is opened.
* `watch` will output the incoming Rx telegrams directly to the console. You can also put on a watch on a specific EMS device ID or telegram ID. Also choose to output as verbose text or raw data bytes. these in its 'raw' data format and also watch a particular ID.
- There is no "serial mode" anymore like with version 1.9. When the Wifi cannot connect to the SSID it will automatically enter a "safe" mode where the Serial console is automatically activated (note Serial is always available on the ESP32 because it has multiple UARTs). The EMS-ESP will blink fast when in Serial mode. Connect via a USB with baud 115200 to see the serial console. Note in this mode the EMS will be disconnect so there will be no incoming traffic. Use only for debugging or changing settings.
- The onboard LED behaves like in 1.9. A solid LED means good connection and EMS data is coming in. A slow pulse means either the WiFi or the EMS bus is not connected yet. A very fast pulse is when the system is booting up and configuring itself, which typically takes 5 seconds.
## **Uploading the firmware**
- If you're not using PlatformIO, use the command-line and Python. You can download Python from https://www.python.org/downloads/. Make sure you also get:
- `esptool`, install using the command `pip install esptool`
- and for OTA updates later, `espota` from https://github.com/esp8266/Arduino/blob/master/tools/espota.py using `python espota.py --debug --progress --port 8266 --auth ems-esp-neo -i ems-esp.local -f `
- Grab the latest firmware binary from https://github.com/proddy/EMS-ESP/releases/tag/travis-v2-build
- Uploading directly via USB.
For ESP8266: `esptool.py -p -b 921600 write_flash 0x00000 `
note: if this fails try a lower speed like `115200` instead of `921600`.
For ESP32: `esptool.py --chip esp32 --port "COM6" --baud 921600 --before default_reset --after hard_reset write_flash -z --flash_mode dio --flash_freq 40m --flash_size detect 0x1000 XX\.platformio\packages\framework-arduinoespressif32\tools\sdk\bin\bootloader_dio_40m.bin 0x8000 XX\.pio\build\esp32\partitions.bin 0xe000 XX\.platformio\packages\framework-arduinoespressif32\tools\partitions\boot_app0.bin 0x10000 `
- Uploading over WiFi: `espota.py --debug --progress --port 8266 --auth ems-esp-neo -i -f `
## **Setting EMS-ESP up for the first time**
- Connect to the Access Point called ems-esp using the WPA password `ems-esp-neo`. When you see the captive portal sign-in with username `admin` and password `admin`. Set the WiFi credentials and go back to http://ems-esp
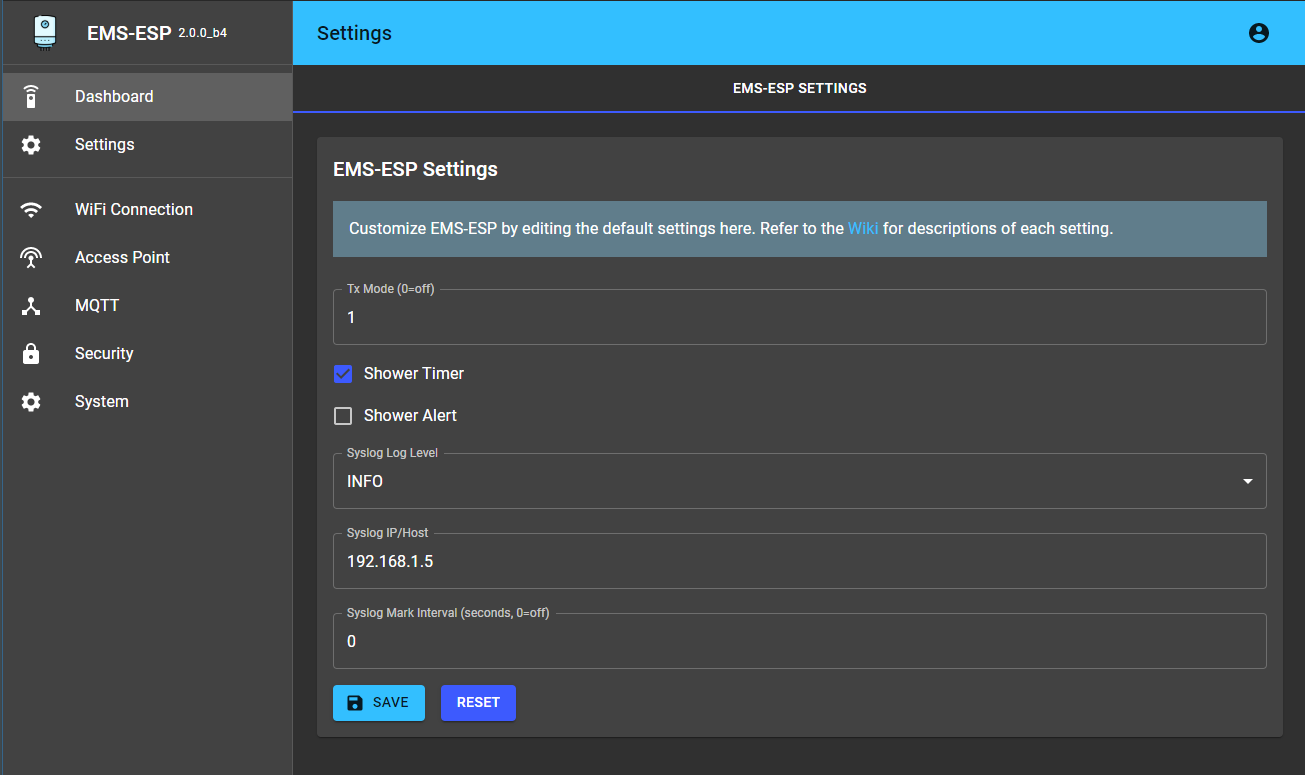
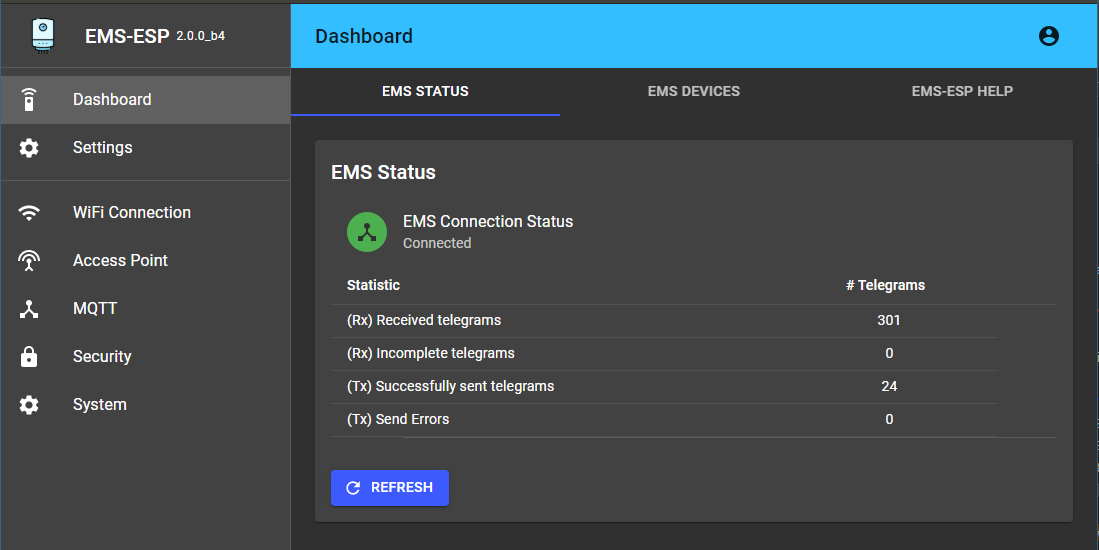
- First thing to check is if Tx is working and that you have a connect to the EMS bus. If it's showing an error try changing the Tx Mode from the settings page. Then check the Status (no need to restart EMS-ESP).
## **The Console**
Connecting to the console will give you more insight into the EMS bus traffic, MQTT queues and the actual device information. The console is reachable via Telnet (port 22) or via the Serial port if using an USB (on baud 115200). To change any settings in the console you must be admin (use `su` with the default password `ems-esp-neo`). On an ESP8266 the Serial port is disabled by default unless it's unable to connect to the WiFi.
The `call` command is to execute a command. The command names (`[cmd]`) are the same as the MQTT command listed in the next section.
(* = available in su/Admin mode)
```
common commands available in all contexts:
exit
help
log [level]
watch [ID]
su
(from the root)
system (enters a context)
boiler (enters a context)
thermostat (enters a context)
set
fetch
scan devices [deep] *
send telegram <"XX XX ..."> *
set bus_id *
set tx_mode *
show
show devices
show ems
show values
show mqtt
system
set
show
format *
show users *
passwd *
restart *
set wifi hostname *
set wifi password *
set wifi ssid *
wifi reconnect *
pin [data] *
boiler
read *
call [cmd] [data] *
thermostat
set
set master [device ID] *
read *
call [cmd] [data] [heating circuit] *
```
----------
## **MQTT commands**
Breaking change: The MQTT base has been removed in version 2. The hostname is only used as prefixed to the topic, e.g. `ems-esp/status`.
All commands must be written as `{"cmd": ,"data":, "id":}`.
The `id` can be replaced with `hc` for some devices and represented as a string or a number. `cmd` is a string, `data` can be a string or number.
```
*boiler_cmd*
comfort
flowtemp
wwtemp
boilhyston (negative value)
boilhystoff (positive value)
burnperiod
burnminpower <%>
burnmaxpower <%>
pumpdelay
*thermostat_cmd*
--- without hc ---
wwmode
calinttemp
minexttemp
building
language (0=de, 1=nl, 2=fr, 3=it) only RC30
display (0=int temp, 1= int set, 2=ext. temp, 3=burner, 4=ww, 5=mode, 6=time, 7=date, 8=smoke) only RC30
clockoffset (only RC30)
--- with hc ---
mode
temp
nighttemp
daytemp
nofrosttemp
ecotemp
heattemp
summertemp
designtemp
offsettemp
holidaytemp
remotetemp
control <0 | 1 | 2>
pause
party
holiday
date
*system_cmd*
send <"0B XX XX ..">
pin
```
## **Basic Design Principles**
- The core services like telnet, logging and shell are based off the libraries from @nomis. I also adopted his general design pattens such as making everything as asynchronous as possible so that no one operation should starve another operation of it's time to execute (https://isocpp.org/wiki/faq/ctors#static-init-order).
- All EMS devices (e.g. boiler, thermostat, solar modules, mixing units etc) are derived from a factory base class and each class handles its own registering of telegram and mqtt handlers. This makes the EMS device code easier to manage and we can extend with new telegrams types and features.
- For debugging there is an offline mode where the code can be compiled and executed standalone without uploading to an ESP controller. Use `make` (based off GNUMakefile).
## **Customizing the Web UI**
The Web is based off Rick's awesome [esp8266-react](https://github.com/rjwats/esp8266-react/) framework. These are the files that are modified:
**`interface:`**
* `.env` project name and project path to ems-esp
* `.env.development` CORS URL
**`interface/public:`**
* `app/manifest.json` ems-esp name
* `index.html` ems-esp name
* `app/icon.png` 256x256 PNG
* `favicon.ico` replaced
**`interface/src:`**
* `CustomMuiTheme.tsx` colors for dark mode
* `interface/src/wifi/WifiSettingsController.tsx` rename esp8266-react
**`interface/src/project:`**
* `ProjectRouting.tsx` removed demo, added paths to ems-esp/status, ems-esp/settings and *
* `DemoProject.tsx` remove /demo/ and changed title, renamed to EMSESP.tsx
* `ProjectMenu.tsx` title change, added /ems-esp/settings
* `DemoInformation.tsx` removed file
* `types.ts` add variables
* added all custom files starting with EMSESP*
**`interface/src/mqtt:`**
* `types.ts` added mqtt_fails
* `MqttStatusForm.tsx` added MQTT Publish Errors
* `MqttStatus.ts` added function mqttPublishHighlight
* `MqttSettingsForm.tsx` added publish time, qos, format
**`interface/src/authentication:`**
* `AuthenticationWrapper.tsx` commented out features.security because we added version
* `AuthenticationContext.tsx` added version
* `MqttSettingsForm.tsx` added publish time, qos, format
**`interface/src/components:`**
* `MenuAppBar.tsx` added version to toolbar
**`interface/src/system:`**
* `types.ts` added uptime and free_mem
* `SystemStatusForm.tsx` added system uptime, % free mem
**`lib/framework`:**
* `SystemStatus.h` added #include , #include , #include "../../src/system.h"
* `SystemStatus.cpp` added LittleFS.info(fs_info); root["uptime"], root["free_mem"]
* Commented out all `Serial.print`'s in all files
* `MqttStatus.h` added #include "../../src/mqtt.h"
* `MqttStatus.cpp` added root["mqtt_fails"]
* `SecuritySettingsService.cpp` added version to the JWT payload
* `SecuritySettingsService.h` #include "../../src/version.h"
* `WiFiSettingsService.cpp` added WiFi.setOutputPower(20.0f), moved setHostname
* `OTASettingsService.h` added #include "../../src/system.h"
* `OTASettingsService.cpp` added call to emsesp::System::upload_status(true)
* `features.ini`: -D FT_NTP=0
* `platformio.ini` using our own version
* `factory_settings.ini` modified with `ems-esp-neo` as password and `ems-esp` everywhere else
- A new console. As in version 1.9 it works with both Serial and Telnet but now with a more intuitive Linux shell like behavior. It supports multiple connections and has basic security to prevent any changes to EMS-ESP. A full list of commands is below, here are the key ones:
* `help` lists the commands and keywords. This works in each context.
* `exit` will exit the console or exit the current context. CTRL-D does the same.
* `CTRL-U` for Undo
* `TAB` for auto-complete
* Some specific commands are behind contexts. Think of this as a sub-menu. e.g. `system`, `thermostat`. The path will always show you which context you are in. `$` is the root.
* `su` will switch to super-user or Admin. The default password is "ems-esp-neo" and can be changed with `passwd` from the system menu or via the Web UI (called secret password). When in Admin mode the command prompt switches from `$` to `#`.
* Some settings can be changed in the console. The `set` command will list them.
* `show` shows the data specific to the which context you're in. From the root it will show you all the EMS device information and any external temperature sensors. From a context it will be more specific to that context, e.g. `show mqtt` from `system` will list MQTT subscriptions and show the status and queue.
* `log` sets the logging level. `log off` disables logging. Use `log debug` for debugging commands and actions. This will be reset next time the console is opened.
* `watch` will output the incoming Rx telegrams directly to the console. You can also put on a watch on a specific EMS device ID or telegram ID. Also choose to output as verbose text or raw data bytes. these in its 'raw' data format and also watch a particular ID.
- There is no "serial mode" anymore like with version 1.9. When the Wifi cannot connect to the SSID it will automatically enter a "safe" mode where the Serial console is automatically activated (note Serial is always available on the ESP32 because it has multiple UARTs). The EMS-ESP will blink fast when in Serial mode. Connect via a USB with baud 115200 to see the serial console. Note in this mode the EMS will be disconnect so there will be no incoming traffic. Use only for debugging or changing settings.
- The onboard LED behaves like in 1.9. A solid LED means good connection and EMS data is coming in. A slow pulse means either the WiFi or the EMS bus is not connected yet. A very fast pulse is when the system is booting up and configuring itself, which typically takes 5 seconds.
## **Uploading the firmware**
- If you're not using PlatformIO, use the command-line and Python. You can download Python from https://www.python.org/downloads/. Make sure you also get:
- `esptool`, install using the command `pip install esptool`
- and for OTA updates later, `espota` from https://github.com/esp8266/Arduino/blob/master/tools/espota.py using `python espota.py --debug --progress --port 8266 --auth ems-esp-neo -i ems-esp.local -f `
- Grab the latest firmware binary from https://github.com/proddy/EMS-ESP/releases/tag/travis-v2-build
- Uploading directly via USB.
For ESP8266: `esptool.py -p -b 921600 write_flash 0x00000 `
note: if this fails try a lower speed like `115200` instead of `921600`.
For ESP32: `esptool.py --chip esp32 --port "COM6" --baud 921600 --before default_reset --after hard_reset write_flash -z --flash_mode dio --flash_freq 40m --flash_size detect 0x1000 XX\.platformio\packages\framework-arduinoespressif32\tools\sdk\bin\bootloader_dio_40m.bin 0x8000 XX\.pio\build\esp32\partitions.bin 0xe000 XX\.platformio\packages\framework-arduinoespressif32\tools\partitions\boot_app0.bin 0x10000 `
- Uploading over WiFi: `espota.py --debug --progress --port 8266 --auth ems-esp-neo -i -f `
## **Setting EMS-ESP up for the first time**
- Connect to the Access Point called ems-esp using the WPA password `ems-esp-neo`. When you see the captive portal sign-in with username `admin` and password `admin`. Set the WiFi credentials and go back to http://ems-esp
- First thing to check is if Tx is working and that you have a connect to the EMS bus. If it's showing an error try changing the Tx Mode from the settings page. Then check the Status (no need to restart EMS-ESP).
## **The Console**
Connecting to the console will give you more insight into the EMS bus traffic, MQTT queues and the actual device information. The console is reachable via Telnet (port 22) or via the Serial port if using an USB (on baud 115200). To change any settings in the console you must be admin (use `su` with the default password `ems-esp-neo`). On an ESP8266 the Serial port is disabled by default unless it's unable to connect to the WiFi.
The `call` command is to execute a command. The command names (`[cmd]`) are the same as the MQTT command listed in the next section.
(* = available in su/Admin mode)
```
common commands available in all contexts:
exit
help
log [level]
watch [ID]
su
(from the root)
system (enters a context)
boiler (enters a context)
thermostat (enters a context)
set
fetch
scan devices [deep] *
send telegram <"XX XX ..."> *
set bus_id *
set tx_mode *
show
show devices
show ems
show values
show mqtt
system
set
show
format *
show users *
passwd *
restart *
set wifi hostname *
set wifi password *
set wifi ssid *
wifi reconnect *
pin [data] *
boiler
read *
call [cmd] [data] *
thermostat
set
set master [device ID] *
read *
call [cmd] [data] [heating circuit] *
```
----------
## **MQTT commands**
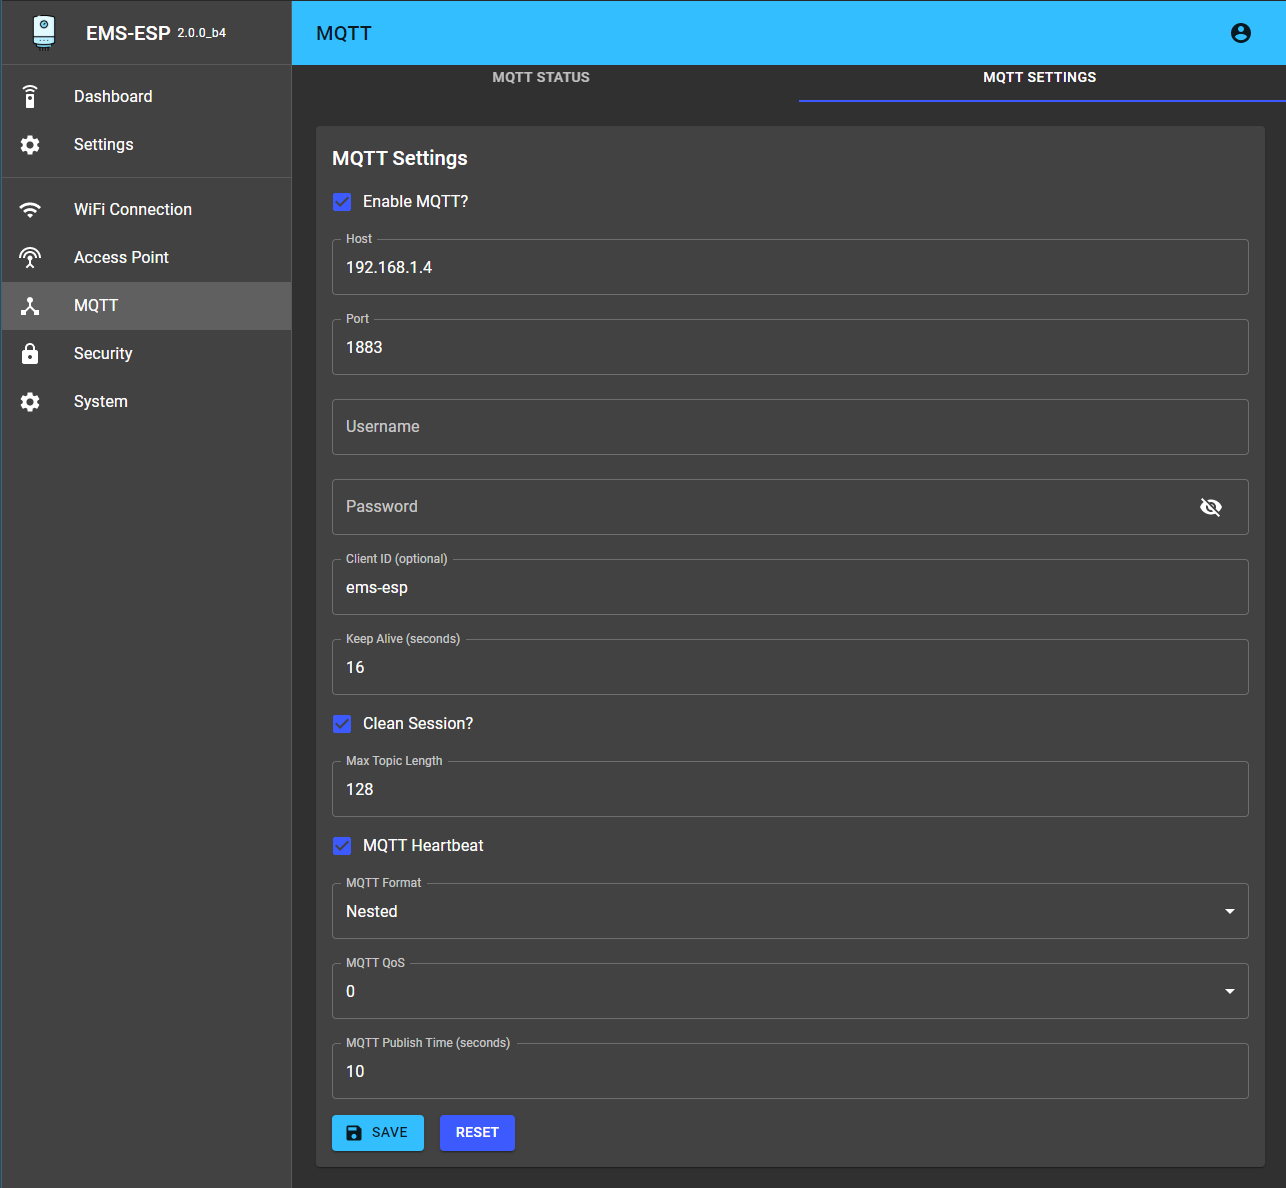
Breaking change: The MQTT base has been removed in version 2. The hostname is only used as prefixed to the topic, e.g. `ems-esp/status`.
All commands must be written as `{"cmd": ,"data":, "id":}`.
The `id` can be replaced with `hc` for some devices and represented as a string or a number. `cmd` is a string, `data` can be a string or number.
```
*boiler_cmd*
comfort
flowtemp
wwtemp
boilhyston (negative value)
boilhystoff (positive value)
burnperiod
burnminpower <%>
burnmaxpower <%>
pumpdelay
*thermostat_cmd*
--- without hc ---
wwmode
calinttemp
minexttemp
building
language (0=de, 1=nl, 2=fr, 3=it) only RC30
display (0=int temp, 1= int set, 2=ext. temp, 3=burner, 4=ww, 5=mode, 6=time, 7=date, 8=smoke) only RC30
clockoffset (only RC30)
--- with hc ---
mode
temp
nighttemp
daytemp
nofrosttemp
ecotemp
heattemp
summertemp
designtemp
offsettemp
holidaytemp
remotetemp
control <0 | 1 | 2>
pause
party
holiday
date
*system_cmd*
send <"0B XX XX ..">
pin
```
## **Basic Design Principles**
- The core services like telnet, logging and shell are based off the libraries from @nomis. I also adopted his general design pattens such as making everything as asynchronous as possible so that no one operation should starve another operation of it's time to execute (https://isocpp.org/wiki/faq/ctors#static-init-order).
- All EMS devices (e.g. boiler, thermostat, solar modules, mixing units etc) are derived from a factory base class and each class handles its own registering of telegram and mqtt handlers. This makes the EMS device code easier to manage and we can extend with new telegrams types and features.
- For debugging there is an offline mode where the code can be compiled and executed standalone without uploading to an ESP controller. Use `make` (based off GNUMakefile).
## **Customizing the Web UI**
The Web is based off Rick's awesome [esp8266-react](https://github.com/rjwats/esp8266-react/) framework. These are the files that are modified:
**`interface:`**
* `.env` project name and project path to ems-esp
* `.env.development` CORS URL
**`interface/public:`**
* `app/manifest.json` ems-esp name
* `index.html` ems-esp name
* `app/icon.png` 256x256 PNG
* `favicon.ico` replaced
**`interface/src:`**
* `CustomMuiTheme.tsx` colors for dark mode
* `interface/src/wifi/WifiSettingsController.tsx` rename esp8266-react
**`interface/src/project:`**
* `ProjectRouting.tsx` removed demo, added paths to ems-esp/status, ems-esp/settings and *
* `DemoProject.tsx` remove /demo/ and changed title, renamed to EMSESP.tsx
* `ProjectMenu.tsx` title change, added /ems-esp/settings
* `DemoInformation.tsx` removed file
* `types.ts` add variables
* added all custom files starting with EMSESP*
**`interface/src/mqtt:`**
* `types.ts` added mqtt_fails
* `MqttStatusForm.tsx` added MQTT Publish Errors
* `MqttStatus.ts` added function mqttPublishHighlight
* `MqttSettingsForm.tsx` added publish time, qos, format
**`interface/src/authentication:`**
* `AuthenticationWrapper.tsx` commented out features.security because we added version
* `AuthenticationContext.tsx` added version
* `MqttSettingsForm.tsx` added publish time, qos, format
**`interface/src/components:`**
* `MenuAppBar.tsx` added version to toolbar
**`interface/src/system:`**
* `types.ts` added uptime and free_mem
* `SystemStatusForm.tsx` added system uptime, % free mem
**`lib/framework`:**
* `SystemStatus.h` added #include , #include , #include "../../src/system.h"
* `SystemStatus.cpp` added LittleFS.info(fs_info); root["uptime"], root["free_mem"]
* Commented out all `Serial.print`'s in all files
* `MqttStatus.h` added #include "../../src/mqtt.h"
* `MqttStatus.cpp` added root["mqtt_fails"]
* `SecuritySettingsService.cpp` added version to the JWT payload
* `SecuritySettingsService.h` #include "../../src/version.h"
* `WiFiSettingsService.cpp` added WiFi.setOutputPower(20.0f), moved setHostname
* `OTASettingsService.h` added #include "../../src/system.h"
* `OTASettingsService.cpp` added call to emsesp::System::upload_status(true)
* `features.ini`: -D FT_NTP=0
* `platformio.ini` using our own version
* `factory_settings.ini` modified with `ems-esp-neo` as password and `ems-esp` everywhere else